
N9777 S/N 471
During the training for my seaplane rating with Paul Furnee, i started to take notes. The notes became more and more, so that i decided to turn them into this report. This document does not substitute any legal document and does not replace thorough training in the aircraft. According to Paul Furnee, a Lake expert and flight instructor with more than 15000 hours in that make, every Lake is different and has its own characteristics. These notes, that might help to step on the step, apply only to the specific aircraft i have flown during my training and are based on my own experiences and perceptions. This document is not complete.

The first encounter with the aircraft of course is to read the FAA approved flight manual. Now you will be surprised: probably you never had less items to memorize for your checkride. The POH counts 7 pages of which one is the title cover, two pages containing a list of revisions, one page weight and balance and three pages of airplane flight manual (mainly numbers that can be seen on the gauges and limitations). The performance section misses information concerning fuel consumption and takeoff distance. Approximate numbers can be found in the “rules of thumb” section.

Preflight (on Land)
Every pilot has his own preferences how to conduct a preflight. Usually with a new aircraft, after following the checklist for the first preflights, i try to establish my own foolproof pattern – so that i don’t forget anything. An example of the flow i have established:
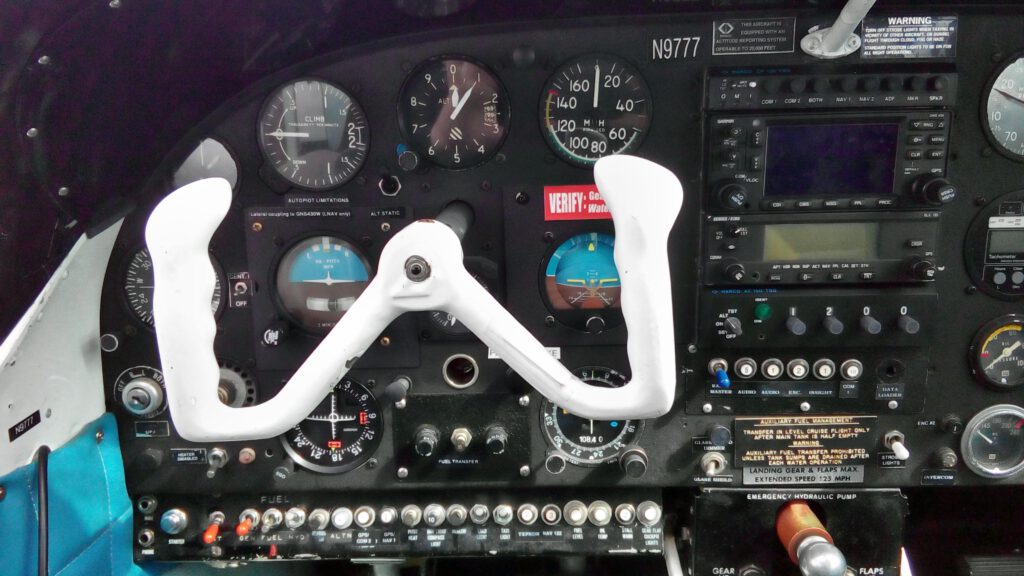
A The very first item i check, is the hydraulic pressure and make sure the gear handle is down. The gear has a down lock but is only safe with hydraulic pressure – which does the main job, holding the gear down.
B I turn on the master, flaps down, check the lights, a test of the hydraulic pump can be performed by recycling the flaps and the trim, until the hydraulic pressure drops below 700 PSI, which should start the pump until the pressure is above 1200 PSI.
C Liquids that should be there: check oil (6qts min – 8 qts), then you should find at least some drops of hydraulic fluid at the bottom of the reservoir stick (the rest of it should be in the actuator), check the fuel level and take fuel samples (two drains on the left fuselage below the wing, if only the main tank is used.)
D Liquids that should not be there: Drain the water from the 7 plugs. It is important that the compartments do not contain oil, fuel or hydraulic oil. Don’t use much torque to close the plugs, I keep them in my hands during the process to make sure they go back where they belong to.
E Walk around, left gear, brakes, lines, left wing, pitot tube, leading edge, aileron, flaps, hull, empennage, right wing, flaps, aileron, leading edge, gear, lines, brakes, nose gear. Then i verify, if i did not miss an item from the checklist.
F Check propeller, exhaust and alternator belt visually, since that part of the aircraft is hard to access
G Before you take your seat in the cockpit, make sure, everything is secure, and no objects remain on the fuselage, since everything will go through the propeller – even your new Ipad Air…

Taxi
Land
The steering is only possible with differential braking, and rudder when it becomes effective at higher speeds. It takes some practice, especially if you are new to that kind of operation. I had previous experiences in DA20 and DA40 – that was very helpful, even if the input forces are different and heavier. Practice on a nice empty tarmac before going to Chicago O Hare…
Water
The preferred ways to taxi in the water is idle taxi (displacement) or step taxi. Plowing is not advisable: lots of water on the window and insufficient engine cooling.
Step taxi is very comfortable between 25 kts and 35 kts groundspeed. Add power and back pressure like during steep turns in the air, just use more power, whatever is needed to keep the boat on the step. Full rudder deflection is possible – aileron into the turn. With forward pressure and more power, the rate of turn can be steepened considerably (don’t do that with more than 30 kts groundspeed or you might find out what a waterloop and increase in insurance premium really is).
If the GPS is out of service (best reference for ground speed) due to malfunction (actual, instructor- or examiner induced) use the airspeed indicator. Step taxi between 30MPH and 40MPH is ideal (you have to convert the reading depending on the wind). Remember: the aircraft should not fly below 50MPH, so keep that safety margin, should a wake launch the aircraft airborne: that would be a short affordable excursion. Step taxi is not recommended, if the waves are higher than 12 inches, or 6 inches in a crosswind.

Takeoff
Every takeoff is performed with the flaps extended. Fuel pump usually ON for the first flight of the day. The correct operation of the fuel pump is very critical: Since the engine driven fuel pump has a very difficult job to do (with very little suction, bring the fuel all the way up through the pylon and the fuel filter), fuel pressure should be monitored regularly, like oil pressure and oil temperature. In general, it should also be noted, that the propeller turns counterclockwise, which will tend to generate right turning, or rolling tendencies. P-Factor is not noticeable, because the engines position is near the CG and can not create enough arm. On a water takeoff, left aileron could be needed to compensate for the right rolling motion – in other words, to keep the wings level.
Land
Lift of at 60 MPH, if you are used to Skyhawks, expect much more back pressure to get the bird in the air. As soon as airborne, retract the gear – so it can build up airspeed and altitude quicker: a landing on the remaining runway with gear up would cause very little damage. At a safe altitude (usually 500 AGL) fuel pump off and retract the flaps. Make sure you accelerate the airplane (pitch for airspeed) to about 80 MPH before you retract flaps: retracting the flaps, while hanging in the sky with 65 MPH can be a very deceiving experience. The first concern: gain energy! In case of an engine failure during the initial climb, be prepared to add heavy forward pressure to maintain control of the aircraft. Due to the high thrustline, a sudden reduction of power will cause a strong pitch up moment – specially compared to other aircraft with a lower thrustline including your Skyhawk.
Water
Make sure, the water rudders and the gear are up – prop high, add full power with elevator in the full aft position. When the spray moves behind the window release back pressure or even add forward pressure, if needed to bring the aircraft on the step. If that does not work, try with an abrupt rocking motion (Elevator AFT/FORWARD) to bring a heavy aircraft on the step. Do not try to lift off before reaching the correct airspeed: the aircraft will usually detach from the water around 60 MPH. Make sure, you adjust back pressure timely, to maintain a slight nose high attitude after liftoff.
In rough water, special care should be applied to maintain a steady pitch attitude. Really that is the only important task. Quick, small elevator adjustments are usually needed. Observe what the flying boat wants to do and act quickly. Should variations in pitch become too erratic, an aborted takeoff is always advisable.
Indications for critical conditions are frequent white caps, winds of more than 15 knots and wave heights of more than 12 inches – specially if the period is (spacing of the waves) more than the half of the hull length.

Landing
Water
Before Every Water landing, make sure that the gear is in the up position. Different Pilots, different people, different brains, different habits, different preferences but same accidents! I quote Paul Furnee: “You can get away with some mistakes, but that one you can not afford: gear down landing on water”. Find your own personal routine, that assures the correct position of the gear on a water landing. While a gear up landing on a runway in a conventional aircraft mainly hurts your ego and the insurance, a gear down landing on water hurts much more: the highest loss you can imagine is very likely to happen. My routine is:
I speak out loudly:
“I am going to land on WATER, the wheels must be UP”
I locate the gear handle and name it:
“This is the gear handle – because it looks like a wheel”
I don’t touch it. I point at it with my hand like i would shake an imaginary hand – I never touch that handle unless there is a runway in front of me. On the other hand i touch the gear up indication light with my finger and touch the Hydraulic Pressure Gauge also with my finger while i readout the value and make sure it is not below 700 PSI. Then i look outside in the two mirrors. All together that sounds like a little song:
“I am going to land on water, the wheels must be UP!This is the Gear handle because it looks like a wheel!
I do see that gear handle in the up position! ONE!
TWO: I see a light in the UP position!
THREE: The hydraulic pressure is XXX PSI (PUMP ON)!
FOUR: I do not see a wheel out of the window!”
Before i lower the flaps, i point out which one is the correct handle (Yes the Flap handle is shaped like a flap, the gear handle is shaped like a wheel).
Why do i put that much energy into that topic? Pilots should not only talk about their own skills but specially about their mistakes. I managed it to put the gear into the down position (yes, i grabbed the gear handle instead of the flap handle) during my training approaching the water. I knew at the end of that day (no it was not the checkride) that it can happen to anyone, anytime when distracted, complacent or not following a routine that works every single time.
Rough water landing
The Rough water landing is really a comfortable maneuver (of course depending on the characteristics of the water). Usually, that is performed in higher wind conditions. Landing into the wind lowers the ground speed considerably. Make a normal approach at 80 MPH. Over the water (3-5 feet) maintain level flight and add back pressure until the airplane stalls. Coordinate with the rudder, continue to fly it to a stop. The Lake will usually hit the water more or less softly, tail first.
Normal Water Landing (Step Landing)
Determine the conditions, select the approach and landing path, complete the checklist.
When on final, check gear up once more.
Level off a few feet (1-3feet) above the water and now establish your touchdown attitude. For details on touchdown attitude, check the section “The correct picture”.
Glassy Water Landing
I am not going into the details and definitions of glassy water landings, since there is much literature out there (at least consult the FAA Seaplane Operations Handbook)
Be aware that in absence of water structure, depth perception is highly affected. Don’t even attempt a normal landing on water that looks “kind of glassy”. Glassy water disturbed by boat wakes is still a dangerous condition – even if you are able to perceive “some structures” in the water.
Perform the Glassy water landing procedure, when in doubt!
Choose a visual reference (weeds, bushes, low trees on the shore) which you approach and overfly at a low altitude (10-15 feet). Then transition to the correct touchdown attitude.
About 16 inches of manifold pressure will give you a low sink rate at around 60 MPH if the correct touchdown attitude (establish the correct picture) is maintained and wait until touchdown. Don’t flare. Dont change anything. Be patient. The VSI can be used as a supporting crosscheck reference, but only after the final attitude is established – since the instrument lags. Power adjustments of not more then ½ inches MP. After touchdown, reduce power, reduce back pressure.
The correct Picture…
is crucial for a successful and safe water landing! Without establishing and maintaining the correct attitude, every landing will be a trial and error deal. To get the correct pitch attitude – unless you have that already built in your BOS (Brain Operating System) you need to establish visual references. You need two of them:
One visual reference to make sure, the position of the head is calibrated. As an example: Line up one of the window rivets with the dash.
When your head is in the correct position, line up another reference (mark or sticker on the window) with the horizon and let your lake instructor show you the correct touchdown attitude. You still can crosscheck with your attitude indicator, but since you are working on a half, or a third of a degree adjustment, accuracy can not really be obtained through that instrument. The use of the VSI is only recommended, once the correct pitch attitude is established, for crosscheck. Once you have the correct attitude established, make sure, you are within the correct airspeed range for touchdown: 55-70MPH (good) – 60-65MPH (better) !
Crosswind
Crosswind Landing into water with up to 12 knots should not be a problem. The sideload will not be significant, depending on the water condition. Approach in a crab wings level. Do not touch the water with a sponson first and maintain the nose slightly high. If the nose is to low and the aircraft weathervanes (yaws) into the wind after contact with the water, that turning movement could turn into a water loop – since the CG would be far behind that point where the hull contacts the water – AND, just wants to continue its expedition in the direction that force was applied.
Abnormal Operations / Emergencies
A general observation to start with: we know many, many fatal accidents, that started with a minor problem – a failed alternator, the famous light bulb. The first step if a malfunction occurs, is to understand what happens. Analyse, evaluate the problem before you touch handles and buttons and pitch down into the next lake overlooking a powerline.
If handled correctly, and that are the good news, almost any malfunction will be a non event, if water with acceptable conditions can be reached.
In an emergency landing into water, make sure the gear is retracted, the flaps are down, if the engine fails, be prepared for a strong pitch up moment, that must be counter acted with forward pressure on the yoke. Pitch down for an airspeed of at least 80 MPH, or it might be difficult to flare the airplane. If possible, turn to land into the wind, to touchdown at the slowest possible groundspeed. Remember, the plane comes down like a rock ; 500 feet of altitude is needed in order to make a 180 degree turn, dirty, idle. Count 750 ft for a 270 and 1000 ft for a 360 degree turn. In a low power, high speed decent, left rudder is needed.
Be aware of the way, the trim is built. The handle is moved from a neutral position to a nose down or nose up position and should flip back into the neutral position when released. Make sure, the handle is REALLY in that neutral position, or you will have a runaway trim. Also the handle is is held in the neutral position by two springs, so if one of those break, you have also a runaway trim, ask your passenger to hold the handle in the neutral position and land as soon as practicable.
Numbers and Rules of Thumb
Water contact airspeed for a step or glassy:
55-70 MPH better: 60-65 MPH
Power setting glassy water:
16inches manifold pressure
(adjust from there with .5 inches corrections)
Power setting normal approach (water and land):
12-15 inches
Approach speed:
80 MPH
Fuel Consumption:
10 Gallons per hour / Mixture lean
Takeoff Distance:
1200-1500ft grnd roll / 2000-2500ft to clear a 50ft obstscle
(sea level, std atmosphere)
(Add 30% for soft field)